Accounting preparation and configuration of a new company (new in the software sense) is of paramount importance for efficient operation of the system for your
business. Some parameters such as fiscal year dates must be specified from the beginning otherwise they cannot be changed after the start
of accounting transactions without using special tools.
The following steps should be at least reviewed in order to allow you to make the changes required for your business.
| STEP-1 |
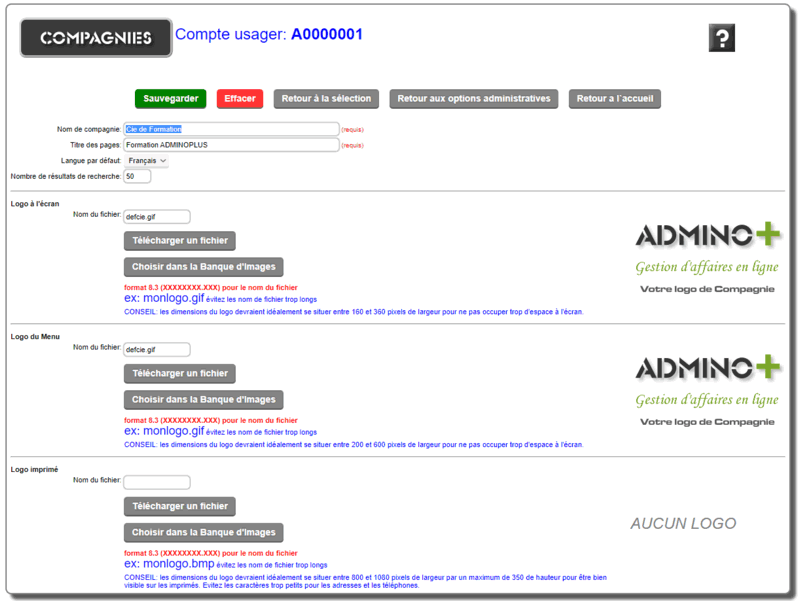
Company Name and Logo: adjust the primary company configuration with the appropriate information.
(companies) If you have a logo of your company, you can upload it in this section. Follow the instructions for size and file type on the page. The format of the file name is important for its retransmission by internet: the format 8.3 (XXXXXXXX.XXX) for the name of the file ex: mylogo.gif avoid file names that are too long.
The dimensions of the logo should ideally be between 160 and 360 pixels wide for the logo on the screen, between 200 and 600 pixels wide for the logo of the menu and between 800 and 1080 pixels wide for the printed logo.
You can also specify the name of the company that appears on the portal and the title of the pages (displayed in the header of the browser) when you work in the company.
You can specify the number of search results according to the size of your screen. 20 by default (50 is a popular number).
|
| STEP-2 |
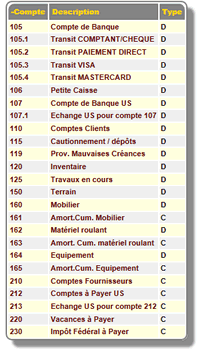
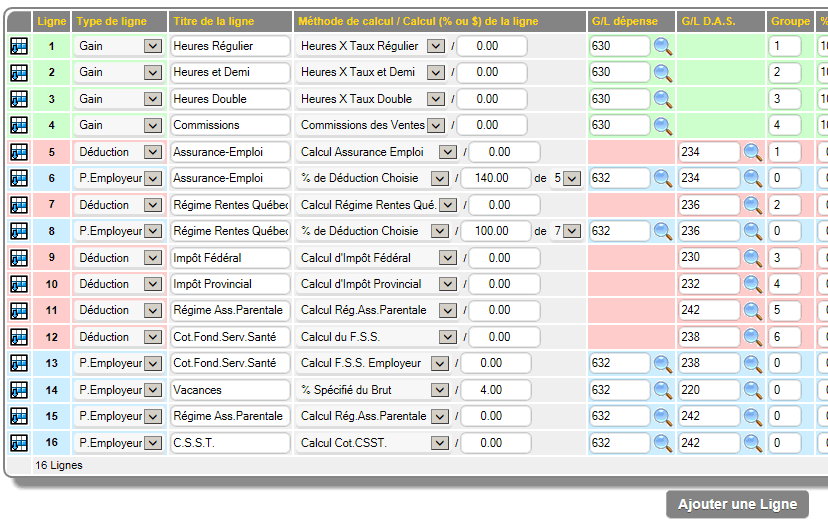
General Ledger Account Chart: Review the chart and add or modify accounts and/or descriptions as needed.
(account chart management) If you already have an account chart, you can modify existing accounts and add missing accounts. For new users, if you are starting the company,
avoid adding too many accounts (for example to detail sales) if you do not need them. Remember that sales and purchase reports can detail transactions without bogging down the general ledger mechanics with unnecessary detail.
Consult your accountant if you have any doubts about the detail or for help setting up your chart of accounts.
|
| STEP-3 |
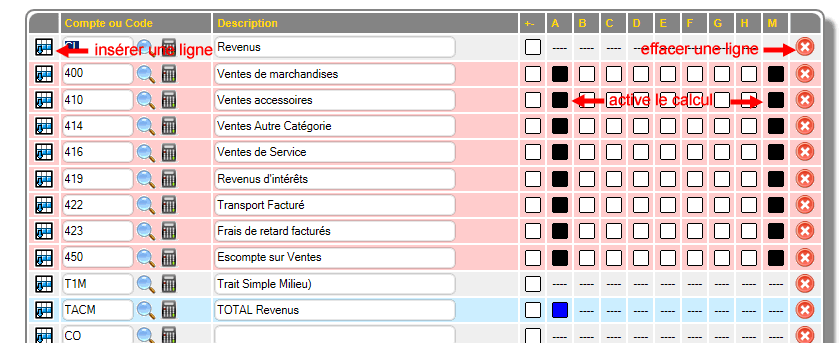
Financial Statement Format: if you have added accounts, either income or balance sheet, then you will need to adjust the financial statements
because the system uses the income statement format to know how to calculate net income and how to treat the accounts during tax closing.
In the generator, you can simply remove or add the missing accounts by copying the settings from the neighboring line.
Later, you can consult the help for all the details of the operation of the generator and the financial statements.
(financial statements management) Don't forget to save your changes.
|
| STEP-4 |
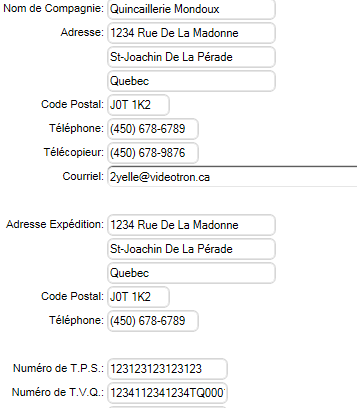
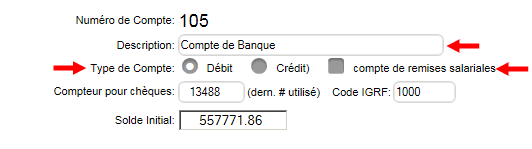
Company Settings: in this section you can correct the name and information about the company including tax and employer numbers.
|
|
| STEP-5 |
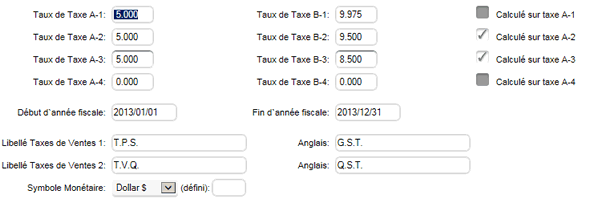
Financial Settings: modify your tax dates, levels, rates, and sales tax labels as needed.
Indicate the G/L accounts for taxes if you have modified this section of the account chart.
|
|
| STEP-6 |
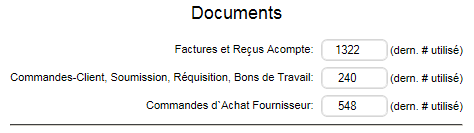
Counters: enter the starting numbers for the various documents. These are the last numbers used, the system will take the next number for the next invoice, etc...
|
|
| STEP-7 |
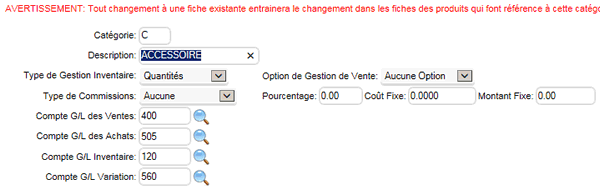
Inventory Categories: modify, add or correct the product categories.
These categories are used to determine the accounting behavior of products when they are sold or purchased.
Correct the G/L accounts if you have modified these sections of the account chart. All requested accounts must be completed.
repeat for other rankings
Customer Rankings
Vendor Rankings
Employee Rankings
|
|
| STEP-8 |
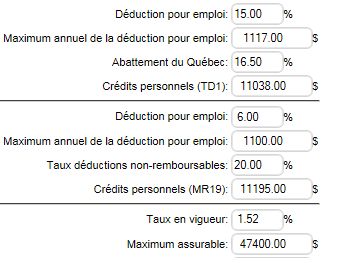
Payroll Settings: if you are using the payroll system, verify and correct the payroll settings as needed.
If you have historical payrolls to enter into the system (payrolls that were made by another system for which you have the details), check the Payroll Templates section.
You may want to create a manual template to enter old payrolls according to each employee's history.
|
|
| STEP-9 |
Accounts Receivable, Payable and Employee Records: Add the customer and vendor records that appear in your current accounts receivable and payable.
Create employee records for those who have received payroll according to your current payroll register.
|
| STEP-10 |
Initialization of Auxiliaries: Unless you have a new company, you will probably need to activate a history for your auxiliaries.
For accounts receivable (accounts receivable) and accounts payable (accounts payable), there are two methods:
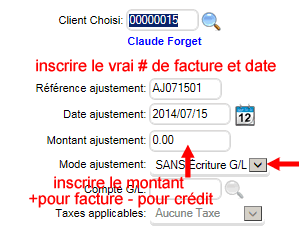
METHOD 1 (by adjustments): This is the most commonly used method. It simply consists of adding the invoices due to the accounts receivable and payable using the adjustments tool.
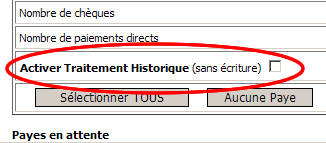
Since we are in history mode, we must activate the NO WRITE mode so as not to affect the G/L. The save button appears after entering an amount.
|
| |
METHOD 2 (by invoice and historical closing): Depending on the number of historical transactions to be made, you can also enter sales and purchase invoices.
The IMMEDIATE POSTBACK option must be disabled to use this method (see financial parameters at the bottom).
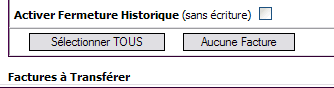
Once your invoices are saved, you close them by activating the historical option.
* the historical mode is an option available in the system as long as the general journal does not contain any accounting transactions. This historical mode does not create any transactions in the G/L and is used to enter the initial history (reconciliation of auxiliaries).
|
|
Once your auxiliaries are logged in, check the accounts receivable and payable reports. They should balance with your reports from the old system.
| STEP-11 |
Initializing the Payroll Register: again there are two methods: the first is faster but will not be able to provide the entire year's pay history for the production of T4 and R1 forms.
The second requires more work but allows the statements to be produced and the payroll remittances to be processed normally. This is the recommended method.
METHOD 1 (without pay): simply go to each employee file, assign them a default template and refresh the cumulatives with the  button.
Then, you enter the cumulative earnings and deductions in the appropriate boxes and save. The next pay will add the amounts to the cumulatives (visible on the paychecks) and so on.
Note that this method does not activate the payroll journal and that no historical pay can be consulted. The end-of-year forms will have to be filled out manually by adding the report from the old system to this system. button.
Then, you enter the cumulative earnings and deductions in the appropriate boxes and save. The next pay will add the amounts to the cumulatives (visible on the paychecks) and so on.
Note that this method does not activate the payroll journal and that no historical pay can be consulted. The end-of-year forms will have to be filled out manually by adding the report from the old system to this system.
|
|
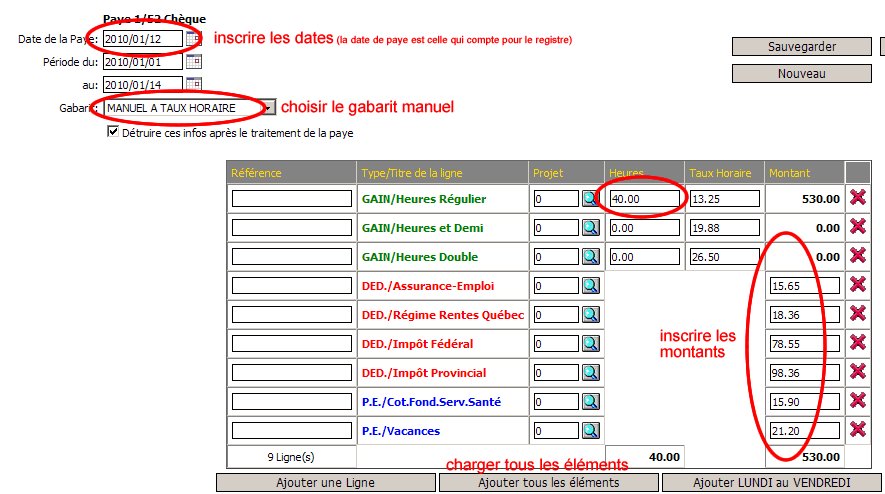
METHOD 2 (Historical Payroll): You will need to enter a payroll preprocessing for each employee.
Next you will need to perform the historical payroll processing. You will need to repeat this step for each pay month. Afterwards you will want to verify the payroll report against the old system.
** If your Payroll Remittances are made for the last pay period and/or you do not need monthly reports preceding the new payrolls (made with this system) then a shortcut is possible.
You only need to enter one payroll per employee that contains the sum of the amounts to date of the payroll register. In this way the register is initialized correctly, but the details of the old payrolls are grouped in a single payroll.
The end-of-year forms will be able to print correctly and the payroll history will contain a single payroll.
|
| STEP-12 |
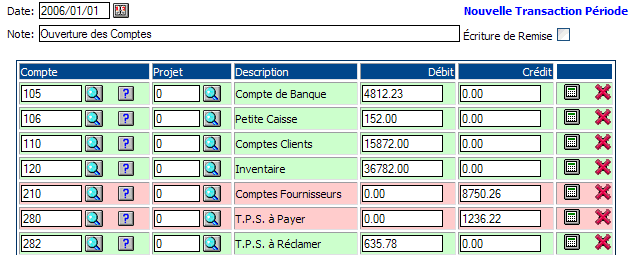
G/L Accounting Initialization: Once the auxiliaries are balanced and the configurations are complete, it is time to add the initial entry to initialize the general ledger balances.
This entry is made using the trial balance of your old system (or the one provided by the accountant with the auxiliary reports).
|
You are now ready to use the system for your current operations. However, you will need to complete your inventory before starting invoicing. |
|


 Production Batches