|
Purchases allow you to enter expenses
via supplier invoices.
Depending on the method used, you can either:
 Make product purchases
and update the inventory. Make product purchases
and update the inventory.
Charge the total amount to the
supplier's account (payables).
Pay the amount immediately
and create a check.
WARNING Any invoice deemed incorrect by
the system (invalid date, incorrect amounts or accounts) will be
placed on hold in the purchase closure and must be corrected before
it can be transferred. For an invoice paid immediately, the check is canceled and the invoice is placed on hold.
To enter a purchase, here are the steps to follow:
1) Choose the supplier by
entering the code or clicking the search to choose it.
2) Enter the invoice number and
click "ENTER" to validate the invoice. The validation checks the invoice number for
this supplier to avoid repeat errors.
3) Check the date and modify
it if necessary. Be careful with dates in the past, taking into account
the taxes to be claimed and the date of your last tax processing.
4) There are two methods for
expenses: By default, purchases are presented
in simple mode.
- Most of the time, the breakdown by G/L account
is the method used.
- Simply choose the expense account and
enter the total amount.
- The detailed mode (presented
here) allows you to specify the purchase of product in the inventory.
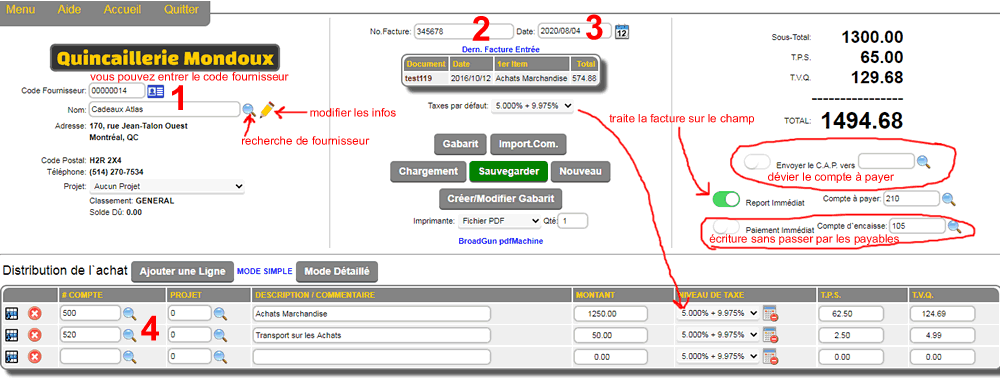
If the expense is a product purchase, you can specify the
product code and adjust the quantity.
By entering the total amount, the system
will make the division and calculate the unit price.
The background color for
a product line will be gold.

The two buttons left of the # ACCOUNT allow you to insert
a line  or delete a line. or delete a line.
The  button on each line shows you the G/L account total. button on each line shows you the G/L account total.
The tax rates chosen in the central section affect the new
detail lines added.
The  button on each line allows you to detax
the amount entered in the TOTAL box. button on each line allows you to detax
the amount entered in the TOTAL box.
Normally the tax level chosen, calculates the taxes to be claimed
automatically.
Sometimes a supplier invoice has
an incorrect tax calculation and we need to correct our invoice to
reflect this error.
In this case, simply correct the appropriate tax box
and click the "ENTER" key several times, (until the end of T.V.Q.) to save the line.
ATTENTION:
If the line is modified again (account, description or amount),
the line will be recalculated again and the modification of the
taxes made will be lost.
PRE-PURCHASE INVOICES (JANUARY 2024)
It is possible to save a future invoice (IE we do not want to report it right away) with the complete data. This type of document is most often used in IMPORT chains to record container reservations
or customs clearance fees or future deposits to be made to the supplier before the release and shipment of the order.
|

|
To activate this mode, simply activate the PRE-PURCHASE button.
|
An existing invoice in PRE-PURCHASE mode that is loaded will offer the possibility of transforming the PRE-PURCHASE invoice into a normal PURCHASE INVOICE and closing it in 1 click. |

|
DISTRIBUTION SYSTEM FOR OTHER COSTS (NOVEMBER 2022)
The detailed mode purchasing system allows a distribution of other costs (transport-customs-exchange rate-etc...) on the unit price of the items according to 3 modes. This does not change the value of the invoice or its distribution in the G/L but the average cost that will be entered in the inventory sheet.
To activate this possibility you must be in detailed mode (with items), have at least one product line and at least one cost line as below.

Once the expense line (at least one) is entered, you will see the distribution symbols on the right of the account.
MODE 1  Distribution by quantity: This mode simply distributes the expenses over all the items, so in this example the amount of $130 is divided by the total quantity of 2 items which gives an amount of $65.00 which will be added to the cost price of the item in the inventory. Distribution by quantity: This mode simply distributes the expenses over all the items, so in this example the amount of $130 is divided by the total quantity of 2 items which gives an amount of $65.00 which will be added to the cost price of the item in the inventory.
The cost line turns blue to indicate the chosen mode.
By placing the mouse on the symbol  next to the unit price, you will see the amount added to the base cost (1347.00 + 65.00). next to the unit price, you will see the amount added to the base cost (1347.00 + 65.00).
By clicking the mode symbol, the distribution is canceled and the line becomes white again. |

|
MODE 2  Distribution by value: This mode distributes the fees in proportion to the value of the items, so in this example the amount of $130 is divided according to the percentage of the cost value of an item compared to the others which gives an amount of $68.43 and $61.57 which will be added to the cost price of this item in the inventory. Distribution by value: This mode distributes the fees in proportion to the value of the items, so in this example the amount of $130 is divided according to the percentage of the cost value of an item compared to the others which gives an amount of $68.43 and $61.57 which will be added to the cost price of this item in the inventory.
The fee line turns green to indicate the chosen mode.
By placing the mouse on the symbol next to the unit price, you will see the amount added to the base cost (1347.00 + 68.43). The second item is worth less so it receives 61.57
By clicking the mode symbol the distribution is canceled and the line becomes white again.
|

|
MODE 3  Distribution by weight: This mode distributes the costs in proportion to the weight of the items, so in this example the amount of $130 is divided according to the percentage of the weight of an item compared to the others which gives an amount of $0.09 which will be added to the cost price of this item in the inventory. Distribution by weight: This mode distributes the costs in proportion to the weight of the items, so in this example the amount of $130 is divided according to the percentage of the weight of an item compared to the others which gives an amount of $0.09 which will be added to the cost price of this item in the inventory.
The cost line turns fuchsia to indicate the chosen mode.
By placing the mouse on the symbol next to the unit price, you will see the amount added to the base cost (1347.00 + 56.80). The second item is 11 lbs. heavier so it receives 73.20
By clicking the mode symbol the distribution is canceled and the line becomes white again. |

|
EXTRA CHARGES (FEBRUARY 2025)
It is now possible to apply miscellaneous fees to the cost of these products retroactively.
|

|
Situation: one or more purchase invoices are created like the two examples here on the right. Some fees can be applied to the invoices as in the examples.
the cost is adjusted on the spot. |

|
A brokerage fee invoice for these two orders arrives some time after the closing of the two invoices.
By clicking one of the buttons
 or or
 you can select products from an order reference or purchase invoice. you can select products from an order reference or purchase invoice.
The products from the last reference (if there have already been other fee invoices) are loaded into a table below the expense breakdown table and any distribution of fees via
are applied to the products according to the chosen mode.
As long as the distribution is not chosen, the button  allows you to cancel the fee distribution selection. allows you to cancel the fee distribution selection.
The NEW COST is recalculated with an algorithm that takes into account the retroactive average cost calculation at the time of the first calculation.
When saving, the cost of these products will be adjusted.
|

|
Section (1) shows the historical cost when creating the purchase invoice for the products.
Section (2) shows the new unit cost of the product.
Section (3) shows the actual inventory cost following the original invoice and the new cost applied with the retroactive calculation.
If items refer to a previous expense invoice, then the evolution of the expenses and cost will be displayed.
|

|
This invoice will be displayed in the history with the display of price adjustments.
The yellow section indicates the distribution of costs on the products concerned.
|

|
The check mark in the Immediate Report box (see yellow) will be checked by default, if the purchase transfer mode (see configuration) is immediate. This option
allows the system to process/close/transfer the purchase invoice to payables or direct payment by check (see next option). This
option only works in NEW INVOICE mode and will not be processed
for an existing invoice upload/modification.
If the Immediate Payment box is checked in NEW INVOICE
ONLY mode and the Immediate Report box is checked, the invoice
can be paid without being reported in payables.

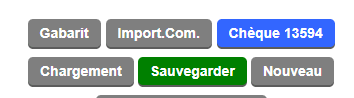
A CHECK button will be available and by clicking it, a check can be prepared for the supplier.
When the check is prepared, the check number appears in the CHECK button ####.
The Payable Option is an advanced function that allows you to transfer the account to another supplier while leaving the purchase to the main supplier. Simply activate the function and choose in the box to the right of the option, the supplier who should receive the account to be paid.

This option is most often used to process a purchase made with a company credit card.
The purchase appears in the purchase report and in the normal vendor history, but the account to be paid is in the vendor specified in the payable option (in this case, the credit card).
APPLICATION OF AN EXCHANGE RATE (NOVEMBER 2022)
The purchasing system allows an application (increase or decrease) of an exchange rate on all the detail lines either in detailed or simple mode.
The goal is to obtain a purchase invoice in Canadian value. If you receive an invoice in a foreign currency, you enter the numbers
on the invoice and following the application of the correct rate, the invoice will reflect a value in Canadian currency that will be entered in the system.
This is the simplest and most direct method.
The other method is to report the exchange amount on a separate line according to the expense account configured in the exchange rate table.
NOTE THAT THIS METHOD WILL NOT BE AVAILABLE IN MANUAL MODE
You can use it in manual mode by entering the exchange rate in the RATE box. To activate the application of the rate, click the DISTRIBUTE EXCHANGE RATE button.

If you update the exchange rate register (see below) you will be able to select the currency of your choice to have the rate of the day. 
The other method is to report the exchange amount on a separate line according to the expense account configured in the exchange rate table.
NOTE THAT THIS METHOD WILL NOT BE AVAILABLE IN MANUAL MODE OR IF NO ACCOUNT IS CONFIGURED

To update the Exchange Rate Register: Go to ADMINISTRATIVE SETTINGS
you will find the EXCHANGE RATE section. |

|
In this function you can automatically update the table via the global exchange rate center via the internet.
The system will add the missing lines to the table.
You can manually update the rates and values ??or delete the lines from the table if desired.
You can choose an expense account to activate the function (ENTER EXCHANGE RATE AMOUNT) by searching or manually. A debit account is required.
A copy option allows you to copy the account from line 1 to the other lines of the table. |

|
DATA ENTRY PROCEDURE MODIFICATION (MAI 2021)
The procedure has been modified for data lines. The reason is that in some cases the confusion of some fields called "LIVE" that update information and calculations. This confusion due to certain updates of WEBKITS in browsers allowed the loss (quite frustrating) of information and the current invoice.
To remedy this eventuality, we have modified the sequence of lines and calculation triggers.
For a normal calculation, we enter the amount and ENTER to the end of the line as in customer invoicing.


To exempt the amount, we can immediately after entering the amount, click the exempt button.
To modify the taxes, you can change the GST and QST (the change triggers the calculation).

|
USING INVOICE TEMPLATES
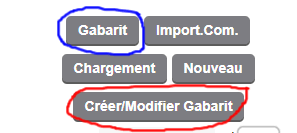
It is possible to create templates (or invoice models) that will be used repeatedly. To create a template, go to TEMPLATE mode by clicking the ACTIVATE TEMPLATE MODE button (circled in red).
Then you can create your template. An invoice number (used as a template number) is required. It is not mandatory to specify a supplier (if the template is used for several suppliers).
You do not have to enter amounts for each line.
A template is mainly used to create invoices with a complex breakdown that require more time to enter repeatedly. These templates cannot be counted.
Once saved, the template is in a template bank separate from the invoices.
To use a template and create an invoice, simply click on the TEMPLATE button (circled in blue) and choose a template in the search. The template will be imported into the invoice. |

|
IMPORTING A SUPPLIER ORDER
When the IMPORT mode (importing a received supplier order)
is used, the detail lines will be BLUE to indicate
that the quantities of the item in this line will not be updated when
saving.
DECEMBER 2022 It is now possible to import multiple purchase orders from the same supplier into a single invoice.
The quantities have already been updated
when the supplier order is received. In addition, the account
and product code will be locked. |
 |
RESUME EXISTING INVOICE AND LOADING
The  button brings up the selection window for existing purchase invoices. Depending on the status of the purchase invoice, it will be green or red. button brings up the selection window for existing purchase invoices. Depending on the status of the purchase invoice, it will be green or red.
For posted invoices (red), it will no longer be possible to modify them.
For open invoices (green), they can be loaded, modified and saved again.
|

|
By clicking on the  button, a viewing window appears and contains the summary of the invoice in question. This allows a preview of the invoice without having to load it. button, a viewing window appears and contains the summary of the invoice in question. This allows a preview of the invoice without having to load it.
The same principle is applied during import except that these are supplier orders and the open/closed status does not apply since only the items received (and not invoiced) will be loaded into the invoice.
|

|
|