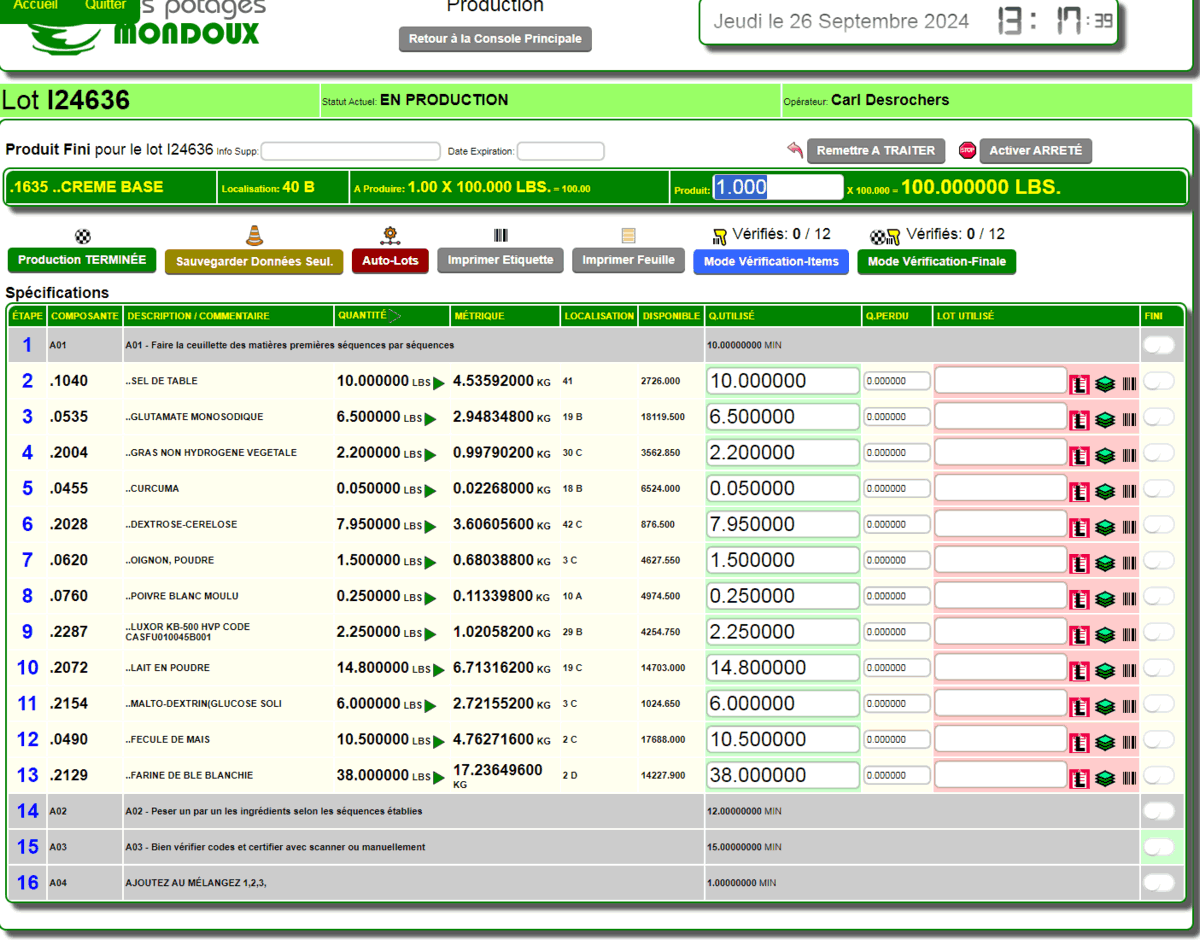
This tool is the dashboard for the operator or producer in the factory.
In this table we can see the status of a production batch (see the Legend at the top right).

We can see the stock status with the 3 icons:
 indicates that the required components are available. indicates that the required components are available.
 indicates that the required components are partially available. indicates that the required components are partially available.
 indicates that none of the required components are available. indicates that none of the required components are available.
If you use two-step production (PREPARATION) and (ASSEMBLY), the column Qty.Verif. (4th from the right) indicates the preparation status according to the scan(1).
If all products are verified, then an icon  indicates that the PREPARATION step is complete (see below in the preparation section). indicates that the PREPARATION step is complete (see below in the preparation section).
By clicking on a BATCH NUMBER you open the production batch in work mode.

2-STEP PRODUCTION MODE
STEP 1 - PREPARATION OF COMPONENTS
1- Use the CHECK MODE-ITEMS tool  to put yourself in Scan mode(1) to put yourself in Scan mode(1)

2- By scanning (scanning or writing) the component code, the system will display the optional message for 2 seconds (method activated for scan 1) and will go into quantity and batch confirmation mode (ORANGE).
The batch can be scanned or simply press ENTER if the AUTO-BATCH function or manual batch selection is used in the work page.
If auto-printing is active, a pre-production label will be printed automatically.
If the operator selects the wrong component, a warning appears.

3- Subsequently, the line becomes green and the system returns to waiting for scanning for the next component. It is not necessary to make the components in the order displayed.
If you want a manual pre-production label, just click the small barcode next to the quantity.

4- Once all the components are verified, click on the RETURN TO PRODUCTION button and you will see the Verified: 999/999 section above the blue button.
5- IMPORTANT Click  to save your work! to save your work!
That's it, the preparation step for this batch is complete.
STEP 2 - FINAL ASSEMBLY OF THE PRODUCT
1- Use the FINAL CHECK MODE tool  to place yourself in Scan mode(2) to place yourself in Scan mode(2)

2- By scanning (scanning or writing) the component code, the system will display the optional message for 2 seconds (method activated for scan 2), the line turns green and the system returns to waiting for scanning for the next component.
3- Once all components are checked, click on the RETURN TO PRODUCTION button and you will see the Verified: 999/999 section above the green button. You will notice that all the lines are activated on the right under the FINISHED column.

4- If applicable, enter additional information and the expiration date at the top.

5- SAVE  complete or incomplete production complete or incomplete production  according to the company's protocol. according to the company's protocol.
An incomplete and partially saved production may be reprocessed for the quantity remaining.
A COMPLETE and saved production will be removed from the table.
IF YOU ARE NOT USING 2-STEP PRODUCTION, you can:
1- Simply manually complete the quantities and/or lots and save COMPLETE or PARTIAL.
2- Use SCAN(1) or SCAN(2) as needed to verify the items and immediately move to the COMPLETE or PARTIAL save.
The system removes the components from the inventory availability as the steps are completed. The production cost is placed in the work in progress account until production is complete.
Once production is complete, the items are removed from inventory and the quantity produced is entered into the finished product. The production cost is removed or moved and recalculated and placed in the finished product inventory account.
Once fully processed, the production will appear in the production tracking under closed batches or orders.

|
|