WEBMINO Manual

System What's New ADMINO+/WEBMINO Portal ADMINO+ account menu Company menu Search
Tips and Work Techniques
Accounting Startup Initial Configuration Online Customer Services Rental System Billing and closing
Add inventory
Record stock losses Follow up with your customers/representatives Prepare and ship SERVICE+ options Mini assembly production Manufacturing production Production Batches Import-Export Chains
Administrative Options
Account Subscription Appearance Profiles Users Companies Import-Export
System Settings
General Information Main Menu Appearance Profiles Users Printers Import-Export Special Tools Subscription
Configurations

Administrative Settings
General Section
Company Settings Financial Settings Operational Behavior Counter Management Special Sale Options Point of Sale Financial Statements Warehouses Salespeople Projects Documents
Terminal Printing Emails and Text Messages Bulletin Board Exchange Rates
Categories Section
Inventory Cat. Customer Cat. Supplier Cat. Employee Cat. Routes Sorting Groups Sales Tracking Service Types Service Tracking Documents Service Forms
Salary Section
Templates Constants Federal tax Provincial tax Federal surtax Provincial Surtax Direct Deposit XML Statements
Special Tools
File Maintenance Specific Changes Payroll Tools Custom Forms
Special Modules
Specific Items in Batch Production Settings Syncro Inventory Syncro Customers
Transport Management
Route Management Truck Management Truck Schedule Planning Delivery Console
Customer Service Settings
General Settings Appearance Payments Shipping Home Page Promotions Page Service Page Terms Page Emails Activation
General Ledger Menu
Entries Charter of Accounts Reconciliation Transit Deposits Sales Taxes Payroll Remittances G/L Analysis and Verification G/L archives Budget Liquidity Analysis Daily Activities Quick Project Analysis
Periodic Closures
Fiscal Year Calendar Year Inventory Variation
Financial Statements
Trial Balance General Journal General Ledger Cash Receipts Cash Disbursements Income Statement Balance Sheet Project Analysis Results Analysis
Income Menu
Billing Customer Accounts Cash Receipts Point of Sale Compact Point of Sale Closing Sales Cash Drawer Countertop Invoicing Customer Receipts Account Statements AR Analysis Invoice Printing Accounts Receivable Adjustments Invoice Tracking Open Invoice Tracking Selective Billing Order Tracking Quote Tracking Shipping Console Export Chains Consignments Consignment Tracking Billing Contracts Contract Billing Contract Tracking Pmt Request Tracking. Rental Console Quick Sales Search Mobile Invoicing Mobile Customers
Reports
Accounts Receivable Sales Orders Mail Merge Quotations Statistics Comparative Statistics Compound Statistics Global Sales Global Mail Merge
Expenses Menu
Purchases and Expenses Suppliers Payments Closing Purchases Employees Checks A.P. Analysis Payable Adjustments C.A.R.-C.A.P. Exchange Chain Tracking Import Chains Time Clock Control Attendance Time Clock Supervision
Payroll Processing
Payroll Preprocessing Payroll Processing Direct Deposit Payroll Cancellation Time Clock Transfer
Reports
Accounts Payable Purchases Payroll Records of Employment T4-R1 Forms Commissions Checks
Inventory Menu
Inventory Orders Inventory Verification Products to Order Inventory Changes Inventory Taking Inventory Processing Promotional Changes Product Creator Order Tracking Required Products Intra Branches Intra Reception Assembly Sold Products Analysis Inventory Movement Analysis Lot Analysis IN-OUT Inventory Quick Inventory Search
Reports
Inventory Purchase Orders Inventory Replacement Missing Quantities Assembly Composition
C.R.M./Service
Time Clock Events Today's Events Events to Watch Calendar Event Tracking Service Requests Work Orders Service Schedule Work Order Tracking Daily Route Sheet Customer Visit Tracking Customer Routes Document Bank Forms Management Complete the Forms Table of Forms
Reports
Service
Clinic/Appointments
Dashboard Appointments Monthly Schedule Weekly Schedule Daily Schedule Treatment Follow-up 6 Month Calendar Operation Setup Treatments Rooms
Production
Production Monitoring Production Items Specifications Put into Production Method Management Production Calendar Production Day Production Console Production Cost Variation Required Components Tracking Component Cost Variation Component Usage
Reports
Production Recipes


Adding Inventory

There are two procedures to receive inventory and add it to the software.


Before receiving the products, they must exist (have a record in the inventory). To create them you can go through the PRODUCT SHEETS (long method) if you have a lot of details to put for a product, photos or other special parameters.
Otherwise the PRODUCT CREATOR in QUICK CREATION MODE allows you to add non-existent items in your inventory.
Just scan or enter the product codes to validate if they must be created.
If the product already exists the red message will be displayed for 2 seconds and the product will be deleted ready for the next attempt.


If the product does not exist then a blue message will be displayed and you can continue to fill in the details for the product. Once the description is entered the green button will be displayed. The creation of the sheet is possible from this moment.


Once all your items are created, it is time to decide on the method to put the quantities in the inventory.


METHOD 1 (recommended): Creating a supplier order may seem longer but brings a definite advantage:

- it allows you to check and correct the quantities BEFORE updating the quantities.
- it provides us with PERMANENT PROOF of the receipt of goods (important during an audit by the tax authorities)
- it gives us a permanent history in the supplier's file as well as reception statistics for the product.
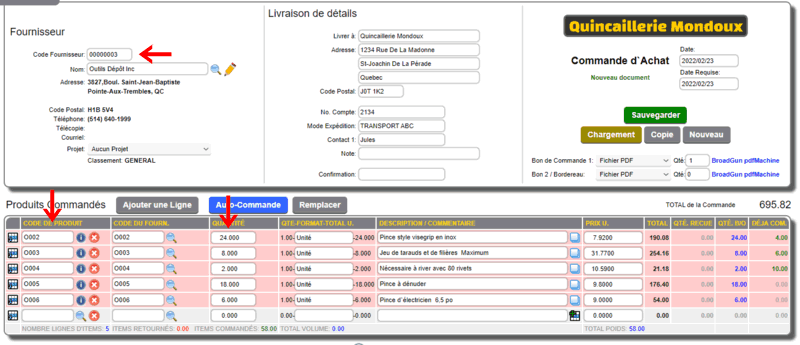

Just:
- choose a supplier.
- enter or scan the product codes received.
- enter the quantities received.
- SAVE the document.


Then:
- reload the created order.
- click the AUTO-RECEPTION button
- check the quantities and correct if necessary.
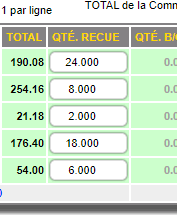
- SAVE again.

That's it, the reception is done! In addition, if you want to process the supplier invoices by purchasing, the order can be imported and avoid entering the information again.


METHOD 2 (fast but less-recommended): Quick quantity entry can be done in 2 ways:

- via the INVENTORY CHECK in ADMIN mode, via the small modification button (pencil on the left).
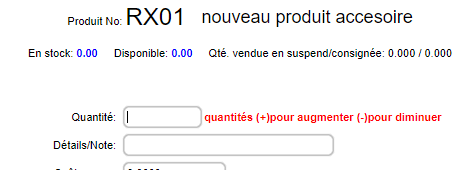


- (WEBMINO ONLY) via the INVENTORY ENTRIES - OUTPUTS in ENTRY mode. This method is extremely fast and seems to be the method of choice but has many deficiencies in terms of proof of receipt because each entry is recorded only in the inventory movement of the product sheet.
A proof can be printed from the ANALYSIS OF INVENTORY MOVEMENT tool for this day but it will be accompanied by any other receipt or activity in the inventory movement. This type of proof is rather poorly received by auditors because it does not distinguish the receipt of this batch of goods.


Finally, it will be up to the manager to validate and choose the desired method by accepting the consequences of his choice.